Address
304 North Cardinal St.
Dorchester Center, MA 02124
Work Hours
Monday to Friday: 7AM - 7PM
Weekend: 10AM - 5PM
Address
304 North Cardinal St.
Dorchester Center, MA 02124
Work Hours
Monday to Friday: 7AM - 7PM
Weekend: 10AM - 5PM

I recently setup OWASP Juice Shop + CTFd for some internal training/CTFs, and I wanted to share the process.
If you have never heard of Juice Shop, then I recommend you check out the OWASP project page.
There is also a useful GitHub repository with some more documentation as well as Docker images.
For more information on CTFd, you can go to their GitHub repository as well.
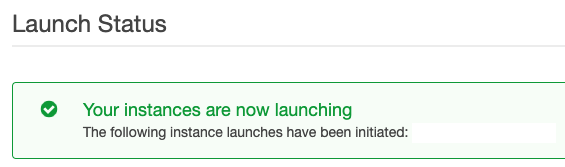
First, I setup a new EC2 instance for my server.
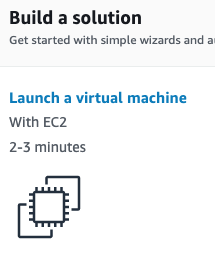
I decided to go with an Ubuntu image in the t2.micro tier.


When I finished my configuration, the instance was created and running.
With the EC2 instance up, it was time to connect to the server.
root@kali:~/JuiceShop# chmod 600 juiceshop-keypair.pem root@kali:~/JuiceShop# ssh -i juiceshop-keypair.pem [email protected] Please login as the user "ubuntu" rather than the user "root". ^CConnection to ec2-xxx.compute.amazonaws.com closed. root@kali:~/JuiceShop# ssh -i juiceshop-keypair.pem [email protected] Welcome to Ubuntu 18.04.3 LTS (GNU/Linux 4.15.0-1057-aws x86_64) * Documentation: https://help.ubuntu.com * Management: https://landscape.canonical.com * Support: https://ubuntu.com/advantage System information as of Thu Feb 13 18:45:46 UTC 2020 System load: 0.25 Processes: 89 Usage of /: 13.8% of 7.69GB Users logged in: 0 Memory usage: 15% IP address for eth0: 172.x.x.x Swap usage: 0% 0 packages can be updated. 0 updates are security updates. The programs included with the Ubuntu system are free software; the exact distribution terms for each program are described in the individual files in /usr/share/doc/*/copyright. Ubuntu comes with ABSOLUTELY NO WARRANTY, to the extent permitted by applicable law. To run a command as administrator (user "root"), use "sudo". See "man sudo_root" for details. ubuntu@ip-172-x-x-x:~$
First, I setup Docker on my new system. I’m not going to cover the installation process, but the following two links should be more than enough to get you started:
Next, I verified that Docker was up and running.
ubuntu@ip-172-x-x-x:~$ sudo systemctl status docker
�--� docker.service - Docker Application Container Engine
   Loaded: loaded (/lib/systemd/system/docker.service; enabled; vendor preset: enabled)
   Active: active (running) since Thu 2020-02-13 18:48:54 UTC; 11s ago
     Docs: https://docs.docker.com
 Main PID: 2989 (dockerd)
    Tasks: 8
   CGroup: /system.slice/docker.service
           �""�"�2989 /usr/bin/dockerd -H fd:// --containerd=/run/containerd/containerd.sock

Feb 13 18:48:54 ip-172-x-x-x dockerd[2989]: time="2020-02-13T18:48:54.312774297Z" level=warning msg="Your
Feb 13 18:48:54 ip-172-x-x-x dockerd[2989]: time="2020-02-13T18:48:54.313013735Z" level=warning msg="Your
Feb 13 18:48:54 ip-172-x-x-x dockerd[2989]: time="2020-02-13T18:48:54.313158796Z" level=warning msg="Your
Feb 13 18:48:54 ip-172-x-x-x dockerd[2989]: time="2020-02-13T18:48:54.313436441Z" level=info msg="Loading
Feb 13 18:48:54 ip-172-x-x-x dockerd[2989]: time="2020-02-13T18:48:54.483095557Z" level=info msg="Default
Feb 13 18:48:54 ip-172-x-x-x dockerd[2989]: time="2020-02-13T18:48:54.601472072Z" level=info msg="Loading
Feb 13 18:48:54 ip-172-x-x-x dockerd[2989]: time="2020-02-13T18:48:54.645443147Z" level=info msg="Docker d
Feb 13 18:48:54 ip-172-x-x-x dockerd[2989]: time="2020-02-13T18:48:54.645763489Z" level=info msg="Daemon h
Feb 13 18:48:54 ip-172-x-x-x systemd[1]: Started Docker Application Container Engine.
Feb 13 18:48:54 ip-172-x-x-x dockerd[2989]: time="2020-02-13T18:48:54.722256553Z" level=info msg="API list
With Docker running, I grabbed the Juice Shop image.
ubuntu@ip-172-x-x-x:~$ sudo docker pull bkimminich/juice-shop
Using default tag: latest
latest: Pulling from bkimminich/juice-shop
c9b1b535fdd9: Pull complete
32eb17722c57: Pull complete
c6a4a31e8940: Pull complete
3f01d5292e29: Pull complete
9c9e52c1b57b: Pull complete
1ca529479291: Pull complete
919fac11c0d7: Pull complete
d989e0d66366: Pull complete
Digest: sha256:d9c1a537f416ee0b163df906184cb836c7ae38861dc48c5f0c4289efe955ae26
Status: Downloaded newer image for bkimminich/juice-shop:latest
docker.io/bkimminich/juice-shop:latest
Next, I ran the image with the basic command, to ensure that it was working.
ubuntu@ip-172-x-x-x:~$ sudo docker run --rm -p 3000:3000 bkimminich/juice-shop

> [email protected] start /juice-shop
> node app

info: All dependencies in ./package.json are satisfied (OK)
info: Detected Node.js version v12.14.1 (OK)
info: Detected OS linux (OK)
info: Detected CPU x64 (OK)
info: Required file index.html is present (OK)
info: Required file styles.css is present (OK)
info: Required file main-es2015.js is present (OK)
info: Required file tutorial-es2015.js is present (OK)
info: Required file polyfills-es2015.js is present (OK)
info: Required file runtime-es2015.js is present (OK)
info: Required file vendor-es2015.js is present (OK)
info: Required file main-es5.js is present (OK)
info: Required file tutorial-es5.js is present (OK)
info: Required file polyfills-es5.js is present (OK)
info: Required file runtime-es5.js is present (OK)
info: Required file vendor-es5.js is present (OK)
info: Configuration default validated (OK)
info: Port 3000 is available (OK)
info: Server listening on port 3000
Unfortunately, I was unable to connect to the server on port 3000, as there were connection issues.
First, I verified that the service was listening on the right port.
ubuntu@ip-172-x-x-x:~$ sudo netstat -tulpn | grep LISTEN
tcp        0      0 127.0.0.53:53           0.0.0.0:*               LISTEN      606/systemd-resolve
tcp        0      0 0.0.0.0:22              0.0.0.0:*               LISTEN      953/sshd
tcp6       0      0 :::22                   :::*                    LISTEN      953/sshd
tcp6       0      0 :::3000                 :::*                    LISTEN      4211/docker-proxy
I thought this might be an issue related to IPv6, so I disabled it everywhere.
ubuntu@ip-172-x-x-x:~$ sudo sysctl -w net.ipv6.conf.all.disable_ipv6=1
net.ipv6.conf.all.disable_ipv6 = 1
ubuntu@ip-172-x-x-x:~$ sudo sysctl -w net.ipv6.conf.default.disable_ipv6=1
net.ipv6.conf.default.disable_ipv6 = 1
ubuntu@ip-172-x-x-x:~$ sudo sysctl -w net.ipv6.conf.lo.disable_ipv6=1
net.ipv6.conf.lo.disable_ipv6 = 1
After also adding these flags to the proper configs, I also restarted my server.
I was still running into some issues, so I also enabled IPv4 IP forwarding.
net.ipv4.ip_forward = 1
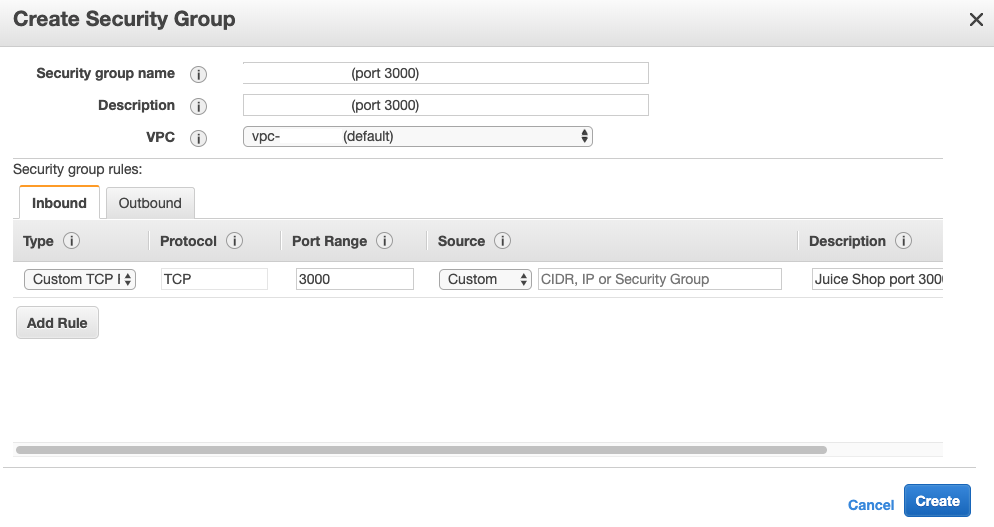
None of these changes allowed me to reach port 3000, so I reached out to my local AWS expert. As it turns out, EC2 blocks all ports other than 22 by default, so I had to add the proper Security Group and permissions.
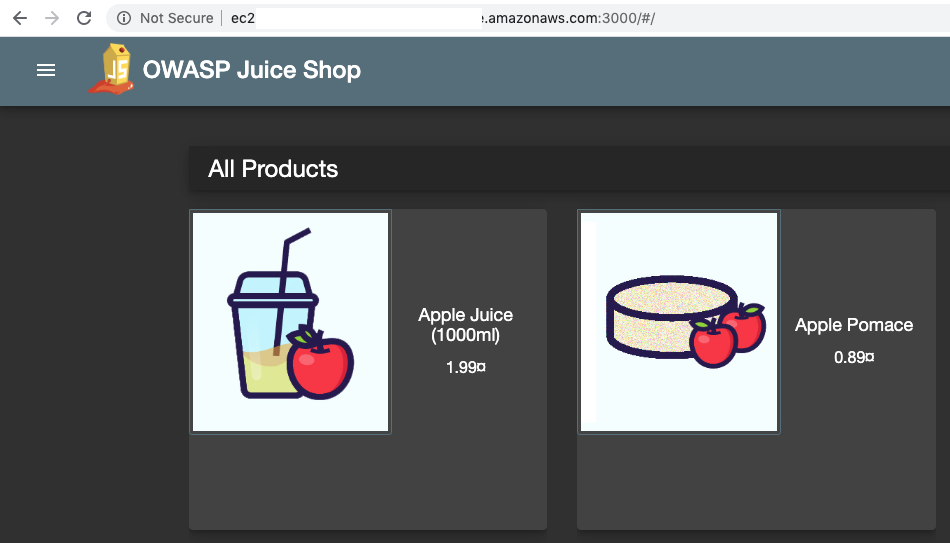
Obviously, this worked, and I was able to connect to the Juice Shop web interface!
Before moving on, I also set my container to run as a daemon, so that I could have it in the background.
ubuntu@ip-172-x-x-x:~$ sudo docker run --rm -d -p 3000:3000 bkimminich/juice-shop
e7f104933039873ead5457017c4e56b83336737b8b416b5585afb70d795bc62f
The juice-shop-ctf-cli package helps to prepare the environment for a CTF, so that was next on my list.
First, I installed npm on my server.
ubuntu@ip-172-x-x-x:~$ sudo apt-get install npm
Reading package lists... Done
Building dependency tree
Reading state information... Done
Next, I installed the cli package.
ubuntu@ip-172-x-x-x:~$ sudo npm install -g juice-shop-ctf-cli
npm WARN deprecated [email protected]: request has been deprecated, see https://github.com/request/request/issues/3142
npm WARN deprecated [email protected]: use String.prototype.padStart()
/usr/local/bin/juice-shop-ctf -> /usr/local/lib/node_modules/juice-shop-ctf-cli/bin/juice-shop-ctf.js
/usr/local/lib
�""�"��"� [email protected]
Before running the juice-shop-ctf tool, I also generated a secret key to use for the flags.
ubuntu@ip-172-x-x-x:~$ date +%s | sha256sum | base64 | head -c 32 ; echo
Mxxx2
With everything configured, it was time to generate my CTFd backup archive.
ubuntu@ip-172-x-x-x:~$ juice-shop-ctf Generate OWASP Juice Shop challenge archive for setting up CTFd, FBCTF or RootTheBox score server ? CTF framework to generate data for? CTFd ? Juice Shop URL to retrieve challenges? http://ec2-xxx.compute.amazonaws.com:3000/ ? Secret keyURL to ctf.key file? Mxxx2 ? Insert a text hint along with each challenge? Free text hints ? Insert a hint URL along with each challenge? Free hint URLs Backup archive written to /home/ubuntu/OWASP_Juice_Shop.2020-02-13.CTFd.zip After the import you will have to set up the CTF name and administrator credentials again! For a step-by-step guide to import the ZIP-archive into CTFd, please refer to https://pwning.owasp-juice.shop/part1/ctf.html#running-ctfd
Before moving on, I also setup my environment variables and reran my container.
ubuntu@ip-172-x-x-x:~$ sudo docker run --rm -d -e "CTF_KEY=Mxxx2" -e "NODE_ENV=ctf" -p 3000:3000 bkimminich/juice-shop
ed6c95d6fb615897da5f7bf7f25eac0887da042ee93fb3b447fa7ff556ffaf5f
Before installing CTFd, I needed to setup Docker Compose.
ubuntu@ip-172-x-x-x:~$ sudo curl -L "https://github.com/docker/compose/releases/download/1.25.3/docker-compose-$(uname -s)-$(uname -m)" -o /usr/local/bin/docker-compose
  % Total    % Received % Xferd  Average Speed   Time    Time     Time  Current
                                 Dload  Upload   Total   Spent    Left  Speed
100   617  100   617    0     0   3505      0 --:--:-- --:--:-- --:--:--  3505
100 16.4M  100 16.4M    0     0  13.2M      0  0:00:01  0:00:01 --:--:-- 17.4M
ubuntu@ip-172-x-x-x:~$ sudo chmod +x /usr/local/bin/docker-compose
ubuntu@ip-172-x-x-x:~$ docker-compose --version
docker-compose version 1.25.3, build d4d1b42b
For more information on the CTFd setup, you can read the following wiki page.
First, I setup a random CTFd_secret_key.
ubuntu@ip-172-x-x-x:~/CTFd$ python -c "import os; f=open('.ctfd_secret_key', 'a+'); f.write(os.urandom(64)); f.close()"
Next, I ran the docker-compose up command to stand up the environment.
ubuntu@ip-172-x-x-x:~/CTFd$ docker-compose up
ERROR: Couldn't connect to Docker daemon at http+docker://localhost - is it running?

If it's at a non-standard location, specify the URL with the DOCKER_HOST environment variable.
ubuntu@ip-172-x-x-x:~/CTFd$ sudo docker-compose up
Creating network "ctfd_internal" with the default driver
Creating network "ctfd_default" with the default driver
Pulling db (mariadb:10.4)...
10.4: Pulling from library/mariadb
5c939e3a4d10: Pull complete

... <snip> ...
This took quite a while, but I also ran it in daemon mode once it finished.
ubuntu@ip-172-x-x-x:~/CTFd$ sudo docker-compose up -d
Building ctfd
Step 1/15 : FROM python:3.7-alpine
 ---> a5d195bb2a63
Step 2/15 : RUN apk update &&     apk add python python-dev linux-headers libffi-dev gcc make musl-dev py-pip mysql-client git openssl-dev
 ---> Using cache
 ---> 6c8cc986fd5c
Step 3/15 : RUN adduser -D -u 1001 -s /bin/bash ctfd
 ---> Using cache

... <snip> ...

WARNING: Image for service ctfd was built because it did not already exist. To rebuild this image you must use `docker-compose build` or `docker-compose up --build`.
Pulling cache (redis:4)...
4: Pulling from library/redis
bc51dd8edc1b: Pull complete
37d80eb324ee: Pull complete
392b7748dfaf: Pull complete
74c85bb8b632: Pull complete
65aba7f17311: Pull complete
d2987ccbb89f: Pull complete
Digest: sha256:b47838c3ab42d810741bfc59d63d02b825c0d52e1dbe9a5d76385e3cbf8395b8
Status: Downloaded newer image for redis:4
Creating ctfd_cache_1 ... done
Creating ctfd_db_1    ... done
Creating ctfd_ctfd_1  ... done
With the installation complete, I verified that CTFd was listening on port 8000 as expected.
ubuntu@ip-172-x-x-x:~/CTFd$ netstat -tulpn | grep LISTEN
(Not all processes could be identified, non-owned process info
 will not be shown, you would have to be root to see it all.)
tcp        0      0 127.0.0.53:53           0.0.0.0:*               LISTEN      -
tcp        0      0 0.0.0.0:22              0.0.0.0:*               LISTEN      -
tcp6       0      0 :::22                   :::*                    LISTEN      -
tcp6       0      0 :::3000                 :::*                    LISTEN      -
tcp6       0      0 :::8000                 :::*                    LISTEN      -
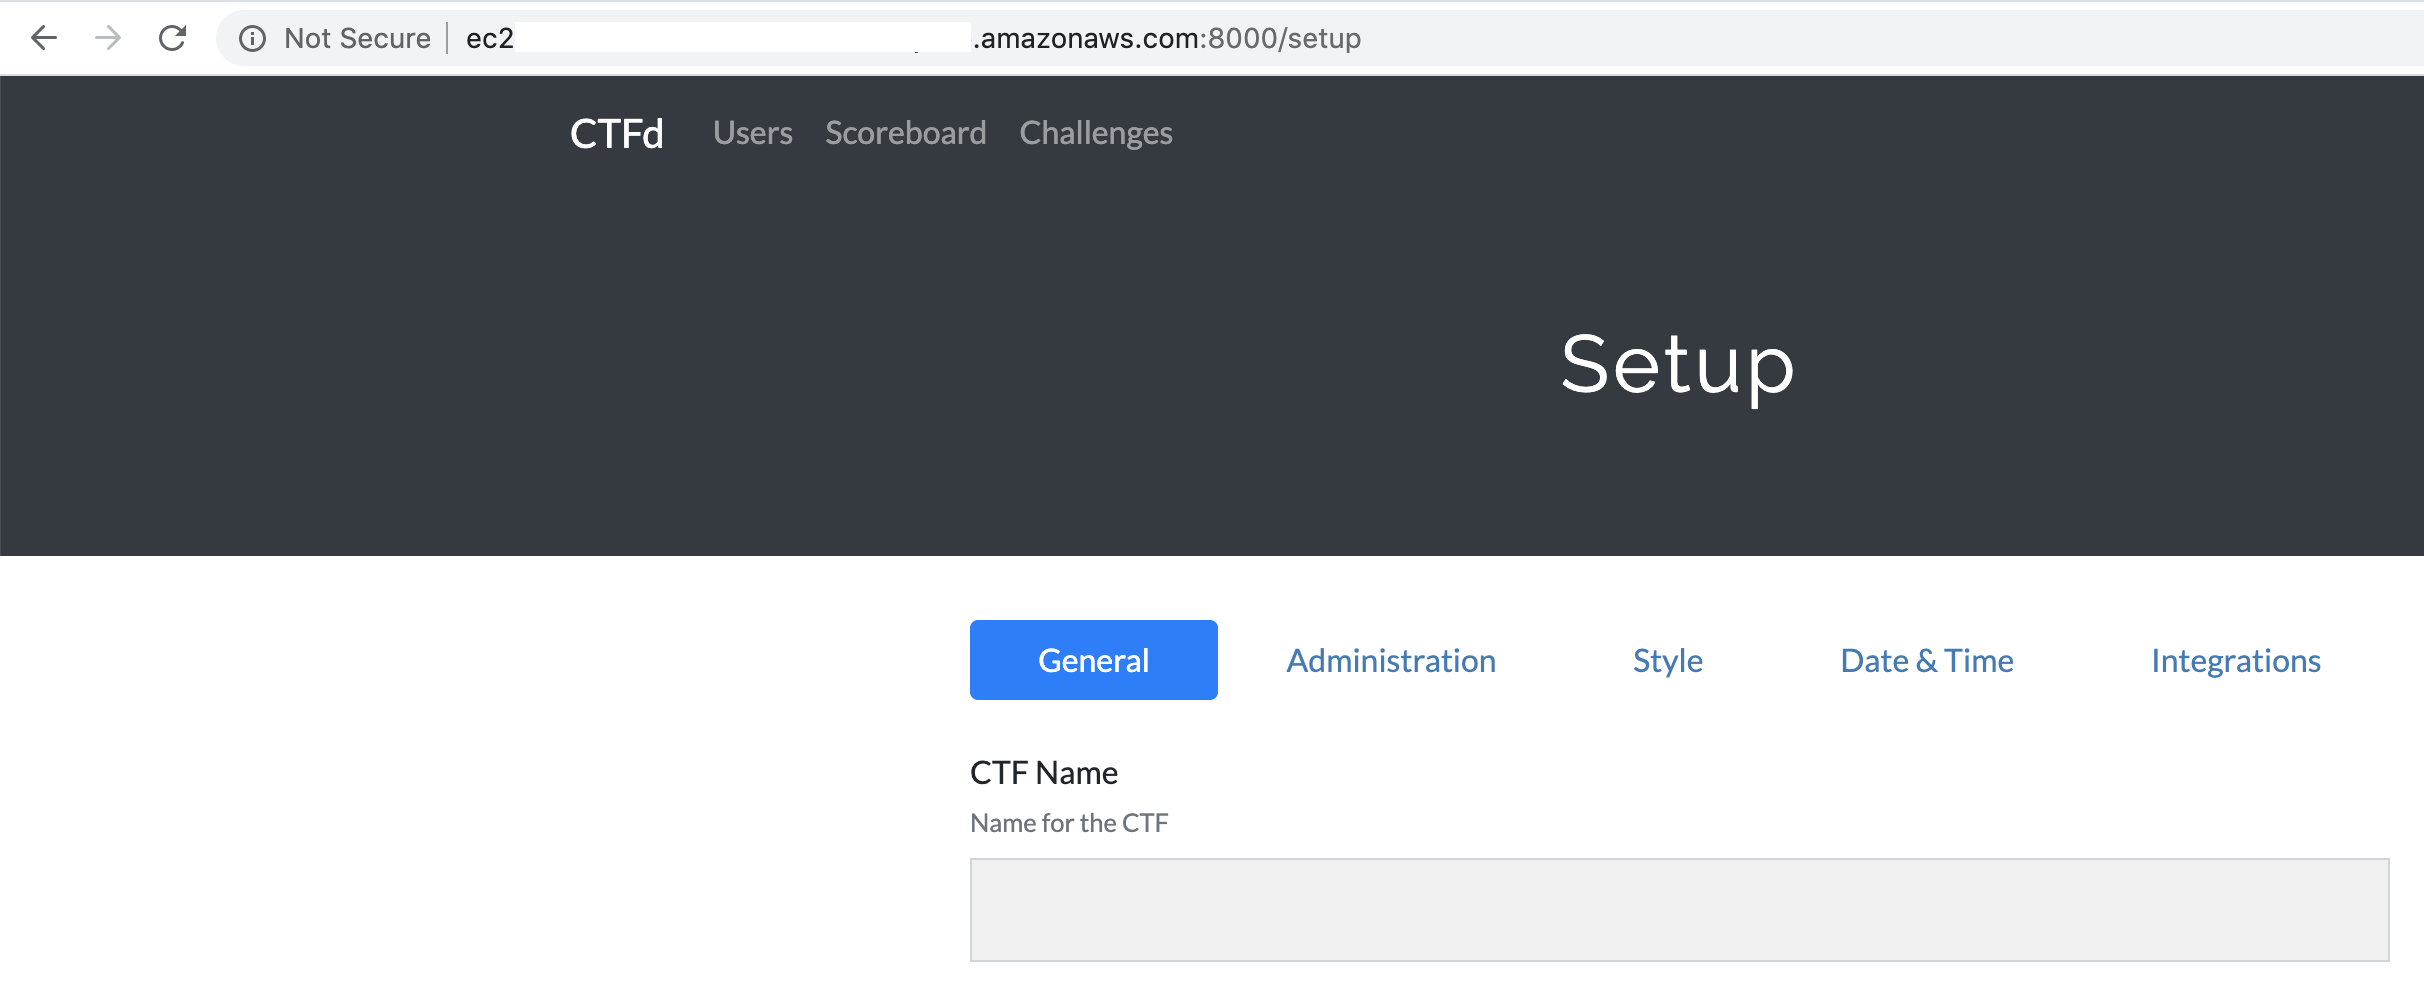
When I went to port 8000 in my browser, I saw the CTFd setup pages.
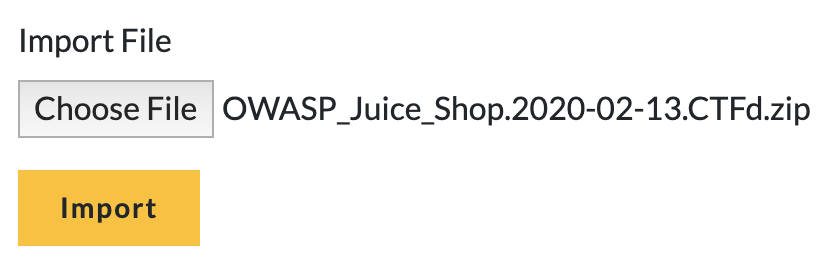
After the initial configuration, I went to the Backup -> Import page, so that I could add my Juice Shop flags.

Before I could select my file, I had to upload the zip file from earlier to my EC2 instance.
root@kali:~/JuiceShop# scp -i juiceshop-keypair.pem [email protected]:/home/ubuntu/OWASP_Juice_Shop.2020-02-13.CTFd.zip .
OWASP_Juice_Shop.2020-02-13.CTFd.zip                                          100%   15KB  52.3KB/s   00:00
When the archive was on my EC2 host, I could select it as my import file.
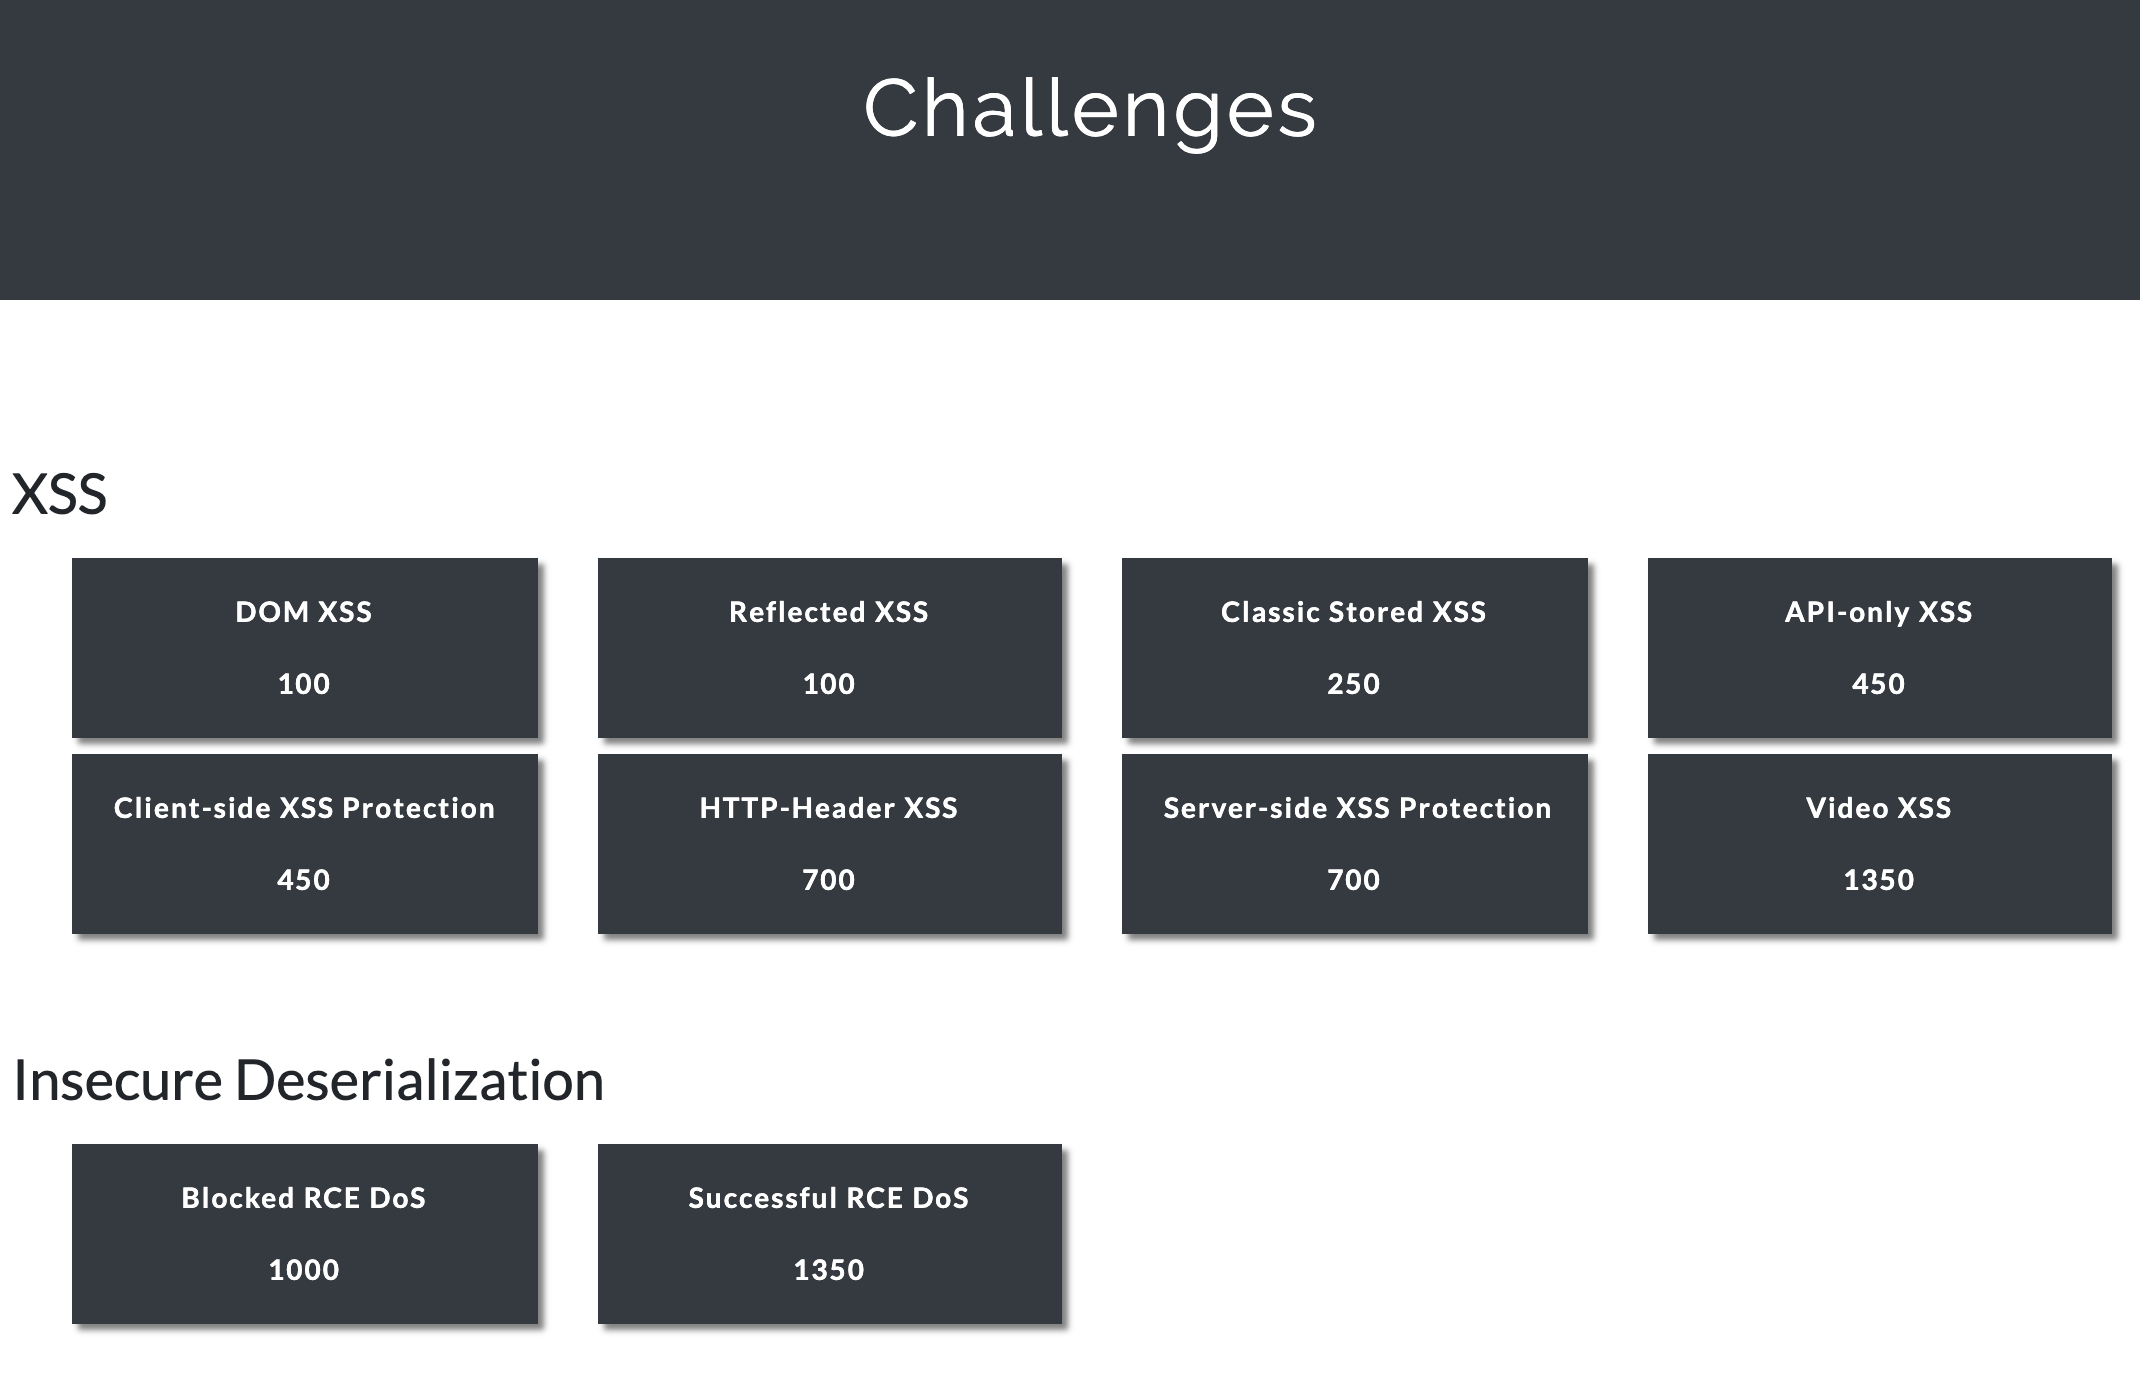
After the import, all the challenges (and flags) were pre-populated!
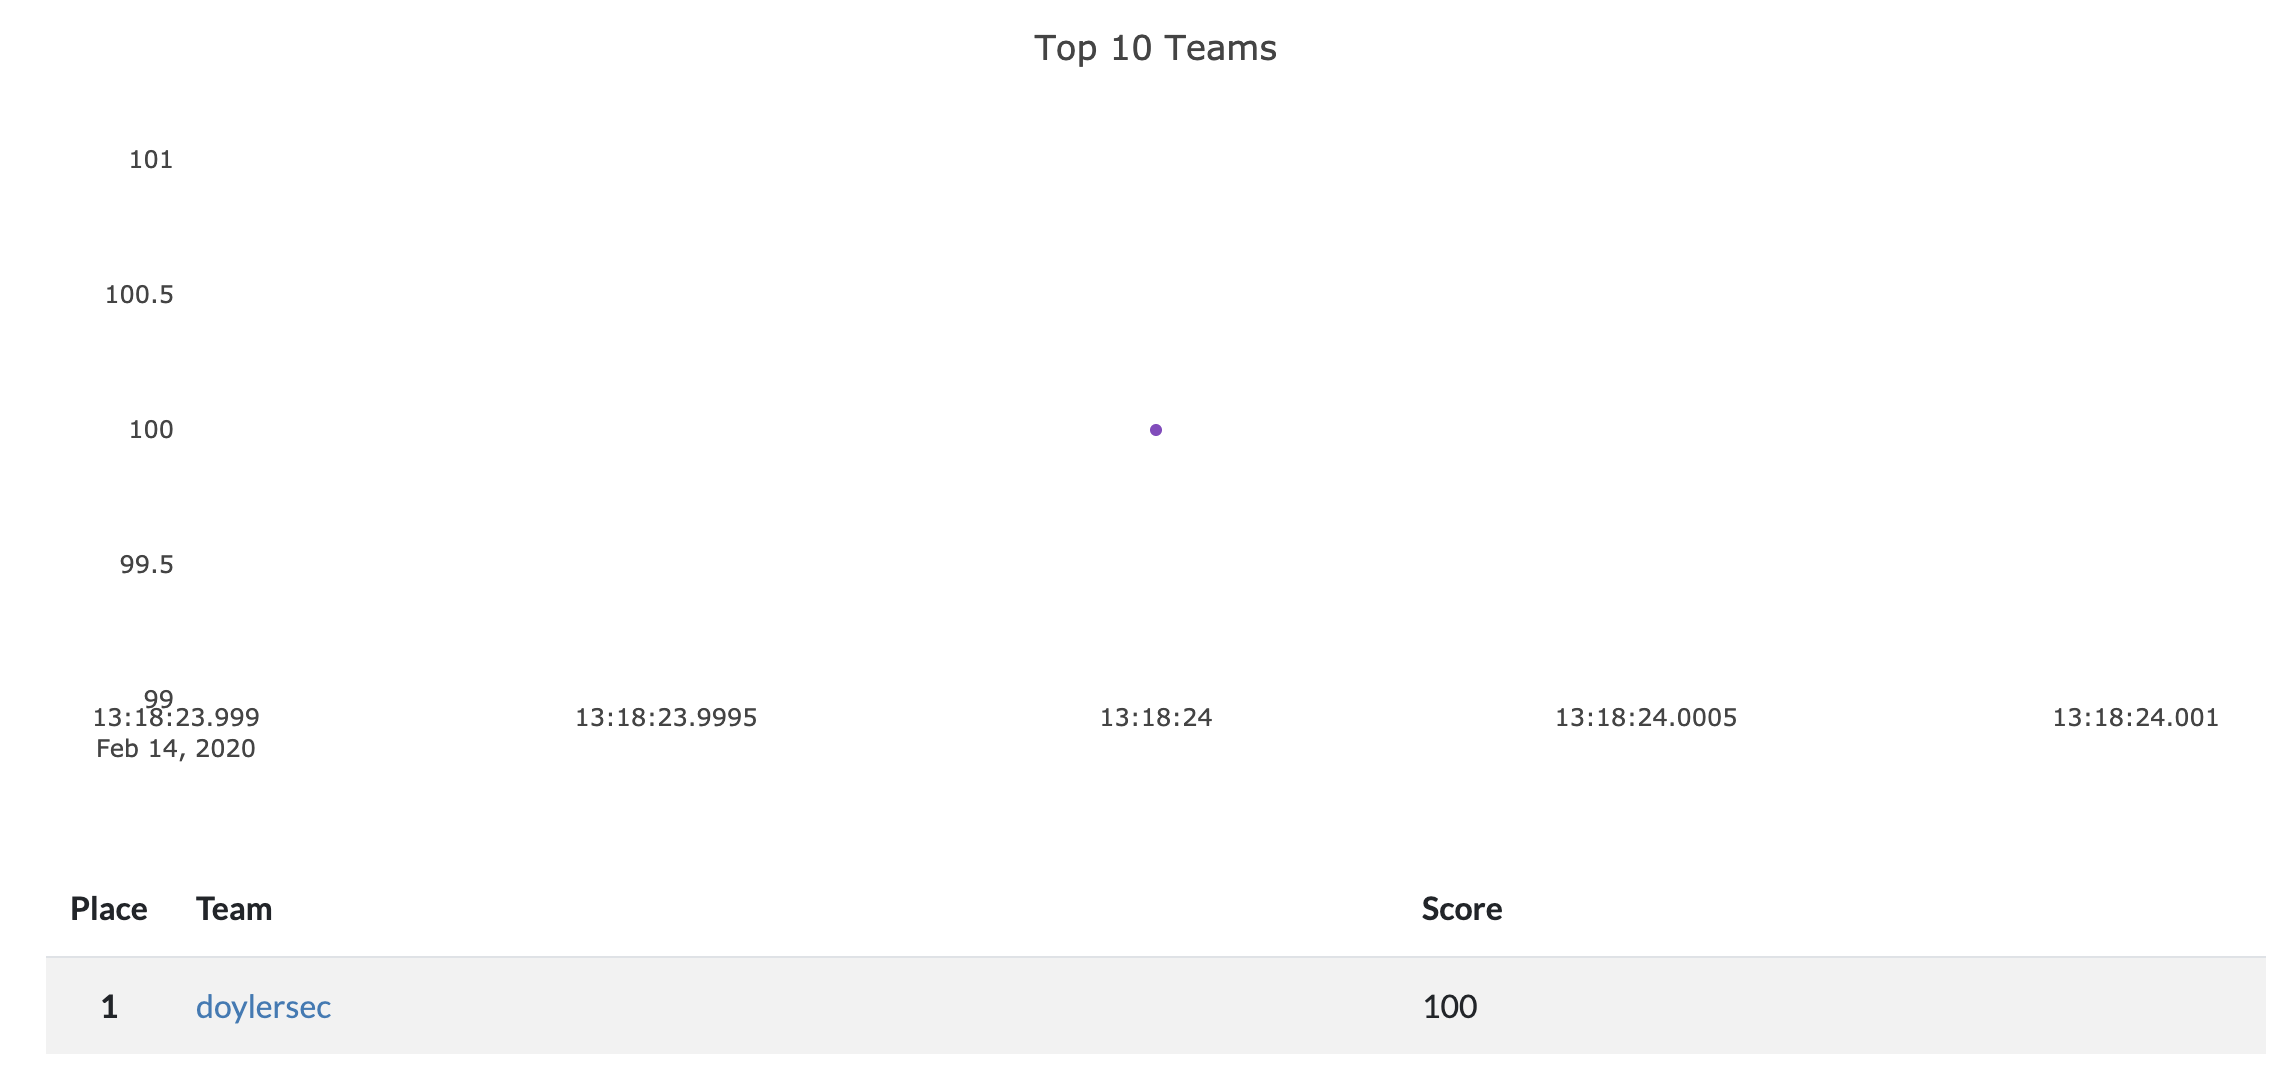
To test everything, I captured the 100-point DOM XSS flag.
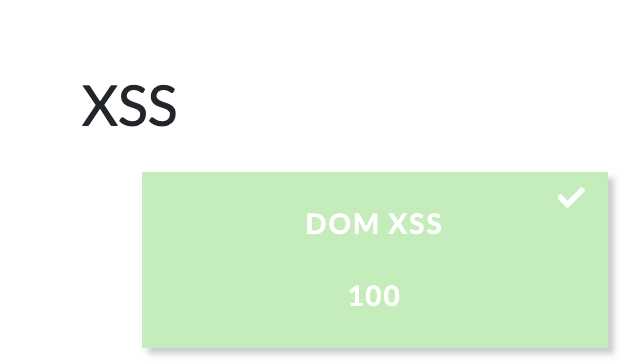
As you can see, I am the only team on the scoreboard, and everything is working as expected.
This was surprisingly simple to get running, and I’m looking forward to using it alongside some training.
The only real downside is that there are write-ups for everything online. That said, this still functions great for an introduction to web application testing as well as CTFs.
I may investigate posting some write-ups for Juice Shop here as well, so stay tuned!
Ray Doyle is an avid pentester/security enthusiast/beer connoisseur who has worked in IT for almost 16 years now. From building machines and the software on them, to breaking into them and tearing it all down; he’s done it all. To show for it, he has obtained an OSCE, OSCP, eCPPT, GXPN, eWPT, eWPTX, SLAE, eMAPT, Security+, ICAgile CP, ITIL v3 Foundation, and even a sabermetrics certification!
He currently serves as a Senior Staff Adversarial Engineer for Avalara, and his previous position was a Principal Penetration Testing Consultant for Secureworks.
This page contains links to products that I may receive compensation from at no additional cost to you. View my Affiliate Disclosure page here. As an Amazon Associate, I earn from qualifying purchases.


[…] OWASP Juice Shop + CTFd = Easy DIY CTFs! […]